3 Raspberry Pi Zero w/Camera Setup
Steps to program the Raspberry Pi Zero computers to capture and store images:
1. Obtain necessary cables/connectors:
- USB 2.0 to microSD card reader (to image SD card on a PC)
- USB 2.0 microUSB male to USB female adapter (to connect keyboard with Pi)
- Keyboard with USB 2.0 wire
- Micro HDMI male to HDMI female adapter & HDMI cable (to connect monitor with Pi) or micro HDMI to HDMI cable
2. Install operating system:
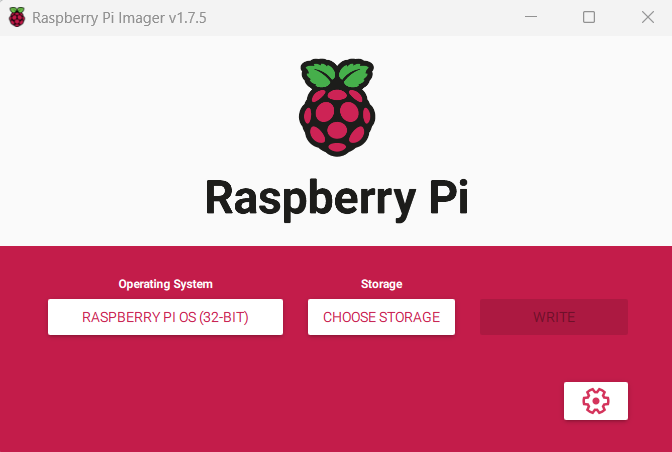
Figure 3.1: Raspberry Pi Imager
- Use microSD card reader to mount SD card onto a PC
- Download and open Raspberry Pi Imager
- Choose OS → Raspberry Pi OS (Other) → Raspberry Pi OS Lite (32-bit)
- Choose Storage → Drive referring to microSD card
- Optional: Gears →
- Set hostname (name of the pi on your wifi network that you ssh [pi_name]@[IP Address] into)
- Enable ssh
- Set username and password (user login information to access the pi)
- Set locale settings (e.g., America/New York & us)
- Write
- Disconnect and insert formatted microSD card into Pi
- Connect Pi to keyboard, monitor, and power source
- Once connected to power, Pi automatically turns on
2. Login with default or already specified login information:
- raspberrypi login: pi
- password: raspberry
3. Configure Pi settings: sudo raspi-config
- Use arrow keys and Enter to navigate
- 1 → S1 Connect to wifi
- SSID: wifi network name
- Passphrase: wifi password
- 1 → S3 change pi password
- 1 → S4 change pi name (not login)
- 3 → I1 enable camera attachment
- 3 → I2 enable remote access (
ssh) - 5 → L2 set timezone
- Finish (type
ywhen asked if you want to reboot)
4. Add static IP address for remote access: https://raspberrypi-guide.github.io/networking/set-up-static-ip-address
5. Continue programming directly or remotely access the Pi through terminal from another PC:
ssh login_name@[IP address]
password:
6. Make a folder/directory named ‘still’ to hold images: mkdir still_[xxx]
- Note: [xxx] refers to the login name of the Raspberry Pi associated with the iLAM
7. Make a directory named script to hold scripts: mkdir script_[xxx]
8. Write a script using a text-editor (e.g., nano) named still_[xxx].sh: sudo nano ./script_[xxx]/still_[xxx].sh and write the following text:
#!/bin/bash
DATE=$(date +"%m%d.%H%M")
sudo raspistill -o /home/$USER/still_$USER/$USER.$DATE.jpg- This script will take images and save them along w/ metadata into the still_$USER directory:
- (Line 1) necessary for any bash file with instructions
- (Line 2) sets the format for the date and time in the file name
- (Line 3) command for pi to take a photo and store it with specified file name/location.
- Hit
control^Xto exit (typeywhen asked if you want to save)
9. To automatically upload/copy images into a remote directory, you may (A) use scp to upload each image after it’s taken, or (b) mount a remote directory and then copy each image.
ssh-keygenandENTERto generate a new SSH key to enable a custom script to automatically upload images without requiring a password inputssh-copy-id -i ~/.ssh/id_rsa [remote_PC_hostname]@[remote_PC IP address]Input password for remote_PC
Option A: Add the following line to the end of still_[xxx].sh:
scp /home/$USER/still_$USER/$USER.$DATE.jpg [remote_PC_hostname]@[remote_PC IP address]:[directory that you want images saved into]/- Option B: Add the following lines to the end of still_[xxx].sh:
10. Schedule the imaging script to run periodically with crontab:
- Access the crontab file
sudo crontab -e- Select the first option to edit the crontab in nano
- Copy the following to the bottom of the file:
This tells the pi to execute the still.sh file every 2 minutes (the order is minute, hour, day of month, month, day of week). When setting up a new crontab, always run it past crontab.guru!
control^Xto exit (type y when asked if you want to save)
11. Access Raspberry Pi image files on your PC:
Even if your iLAM/Pi is programmed to upload files to a remote computer over Wifi, at the end of every experiment, we recommend verifying that all images were properly uploaded/transferred. To remotely download images, you may:
Option A: Download images via Command line
Log in to the Linux/Powershell on your laptop
Option B: Download images via a free file transfer program (FTP) like FileZilla
Open FileZilla: In Site Manager, choose New site
Protocol: SFTP - SSH File Transfer Protocol
Host: [IP Address of Raspberry Pi]
Logon Type: Normal
User: [Pi login name]
Password: [Pi login password]
Connect
Trouble-shooting
-raspistill will not take a picture and returns** *failed to open vchiq instance:
Verify that the camera is connected and the ribbon cable is not damaged:
Determine if the camera or the still_[xxx].sh script is the issue:
Modify permissions of the camera:
sudo chmod777 /dev/vchiq
A Linux reader is required to read the Raspian imaged SD card, when plugged into a Windows PC. Linux Reader is a free option. Instructions can be found here.
Tips:
Useful Linux commands:
- * wildcard (e.g.
*.jpg== all jpeg files) control^Abring cursor to beginning of linecontrol^Ebring cursor to end of linecontrol^Ckill processclearclear all previous text from terminallslist all contents in current foldercd directory_pathchange to named foldercd ~go to home directorycd ..go up one folder levelcd -go back to last foldermkdir dir_namecreate EMPTY folder (directory)rmdir dir_nameremove EMPTY folderrm file_nameremove a filerm -f file_nameremove a file without asking for permissionrm -r dir_namerecursively remove all files from folderrm -rf dir_nameforcefully remove all files from folderren name_1 name_2rename something to something elsecp file_1 file_2copy file_1 to file_2, creates duplicate. note: if file_2 exists will overwrite (NO warning)cp -r dir_1 dir_2copy folder and its contentsnano file_namemake named file and open text editorsudo reboot reboot pisudo shutdown nowsafely shutdown pi (reboots when plugged in again)
- * wildcard (e.g.